You will find many posts/videos about this topic, but I intend to guide you step-by-step with more information to comprehend and also refer to this faster in your future need. You can comment on any improvements, bugs, and thoughts to get me motivated.
This post is based on an actual requirement from my current project with Infor M3 13.4. I’m explaining the general concept aiding with my actual requirement in the project.The Context

A User or any application in an on-premise environment needs
to archive files with Infor IDM. As you are aware we can use Infor Enterprise
Connector to establish a secure connection between the two environments.
Explaining Enterprise Connector is out of this post and you can find more
information here.
In the actual scenario, after archiving
- The users want to search the archived files related to the SBU/DIVI, the Business Process (User, Application, process, etc.), and the upload date.
- Purge files after a predefined retention time.
Prerequisites in Infor IDM.
Document Types
Note: To create a Document Type in IDM you need to be in the IDM-Administrator
role.
For this example, I created a Document Type with the following information. For more information refer to the Infor IDM Guide.
| Tab | Field | Value |
|---|---|---|
| Display Name/Name | BDX_FR_FILE | |
| Document title | Filename | |
| Rest of the Fields | Keet Default values | |
| Attributes | SBU | |
| Display Name | SBU | |
| Data Type | String | |
| Max. Length | 3 | |
| Other | Single-value, Required | |
| UploadDate | ||
| Display Name | UploadDate | |
| Data Type | Date | |
| Other | Single-value, Required | |
| ACL | Public (for this example) |
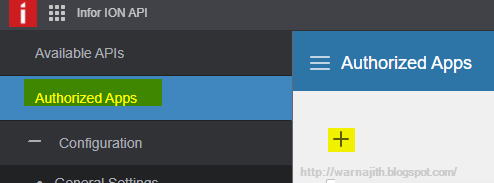
ION IDM API
We have the Infor ION APIs suite to integrate with Infor
IDM. The suite has a bunch of Apis but
for this example, we are using only Add item API. The body parameter in the API
is used to send the document types information along with the file name and
file content (as bast64 string).

The Solution
- Read the file from the location.
- Enrich the BOD with the necessary information for Infor IDM.
- Call the Infor IDM Items (to Add an item).
Configure the file location and the document (BOD)
- Create a File Template.
- Go to Connect-> File Template -> Add
- Add the following Information.
- Save the Information.
- Select GENERATE METADATA. This is will create the required Custom BOD to use in the rest of the data flow.
- Click Yes, in the popup to accept that we are sure to generate the document with provided Document ID.
- Create a connection point to the File folder (refer to the context diagram above), using Enterprise Connector (EC).
- Go to Connect-> Connection Points -> Add -> File
- Add the following information.
- Keep the rest of the settings as it is.
- Click on TEST. If all is good, subfolders will be created in the shared location.
| Field | Value | Remark |
|---|---|---|
| Name | BDX_FR_FILE_SOURCE |
|
| File Type |
Binary |
Fields Format Type, Document ID Filed Name and Raw Data Field Name will automatically fill and will be added to the BOD. |
| File Name Attribute | FileName |
Will be added to the BOD. |
| File Extension Attribute | FileExtension |
Will be added to the BOD. |
| File Path | FilePath | Will be added to the BOD. |
| Document |
FRRAWDATA |
Give any meaningful name. A custom BOD will be created using this name. |
| Tab/ Group | Field | Value | Remark |
|---|---|---|---|
| Name | BDX_FRFileLocation | ||
| Location | Related Enterprise Location | Please check with your System Admin to get the EC data. | |
| Connection Tab | Transfer Protocol | Shared Folder | |
| Provide necessary information Host Name, User name, and Password fields | |||
| Document Tab | Add a Scenario | Click on the + icon | |
| Scenario | Select Read a File from a folder | ||
| Document Tab / File Format Template & Document Settings | File Format Template | BDX_FR_FILE_SOURCE | Select the File Template to create in Step 1. |
| Document Noun | Automatically selected. | ||
| Document Verb | Select Sync | ||
| Document Tab / Read File Settings | Create non-existing folder(s) | Tick On | |
| Read Location | FR_File_In | Substitute your actual folder paths without the hostname only the shared folder path. For sub-folders separate with “/” as an e.g. FR_File_In/FR_File_Error. | |
| Error Location | FR_File_In/FR_File_Error | ||
| Archive Location | FR_File_In/FR_File_Arc | ||
| File Name pattern | .csv | Specify any pattern you need. To accept all the files in the read location you can set this as *.*. |

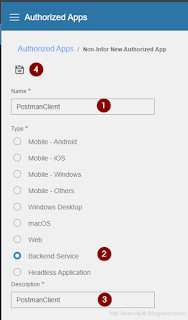
Configure the Infor IDM API Connection
- Go to Connect -> Connection Points-> Add -> API.
- Name it BDX_FR_IDM.
- In the Connection, tab import the legit service account.
- Please contact your System Admin to get the Service Account file, which contains the Access Key, Secret Key, Description, and User Name.
- Go to the Documents Tab and click on the + icon to add ION API.
- Select Send to API option in the Scenario section as we need to post data.
- Select the Input Document tab.
- From the Document dropdown select Sync.FRRAWDATA.
- Select the ION API tab, enter IDM_FR_UPD as API Call Name
- Click on the Select button.
- In the Search ION API Operation dialog select Document Management as Product.
- Then search and select Add an Item (POST, IDM/api/items)
- Click OK to close the popup

- Click on the Request Body tab.
- Tick on in the Map input document to API request check box.
- From the Format dropdown select application/xml. Because we using Sync.FRRAWDATA BOD.
- In the Body EXAMPLE text box add this API Payload. Tip: You can get the payload from Infor IDM API Suite.
- Then save all the changes we made.
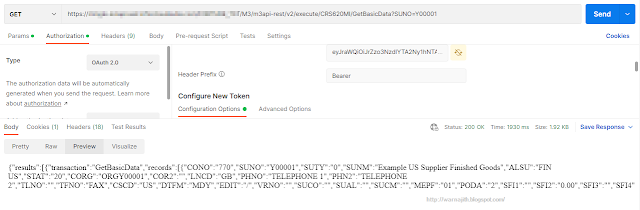
- You can test the API by pasting the below Sync.FRRAWDATA BOD into the Message Content of the Test ION API Call popup.

Create the Document Flow
We are going to create a very simple Document flow as follows.
- Go to Connect -> Data Flows -> Document Flow.
- Name it BDX_FR_IDM_UPD.
- Drag and drop the File activity to the canvas and change properties as follows.
Property Value Remark Name FRSourceFile File Connector BDX_FRFileLocation Hit the New button to create a new file connector and the Details button to review the settings of the selected connector. - Select the File Icon after the File connector we just created and add the document by selecting FRRAWDATA from the Add Documents popup.
- Before calling the IDM API, we have to combine the two attributes FileName and FileExtenstion of FRRAWDATA element in the Sync.FRRAWDATA. Drag and drop the Script Activity after the File, to enrich the BOD. Alternatively, you can use the Mapping activity where the Script is not available. I will discuss it in Appendix 2.
- Change the Script Activity Properties as follows.
Tab Property Value Remark Properties Name ChangeFileName_IDM Script Change_File_Name_IDM Refer to the Script section below for creation. Document Mapping Input Document Sync.FRRAWDATA Output Document Sync.FRRAWDATA Click on the Magnifier Glass icon in the Output Document column and select. Input Parameters Name input_var_1 Input Input Document Content Output Document Script Parameter output_var_1 Header Script Parameter From Input Document - Drag and drop API Activity after the Script.
- Change the properties as follows.
Property Value Remark Name IDM_AddFile Select ION API Connector BDX_FR_IDM - Activate the Document Flow.
- Integration is ready to test.
Appendix 1
Sync.FRRAWDATA BOD structure
The BOD structure generated from Infor ION is as follows.Tip: Note the FRRAWDATA (line number 19) complex element in the BOD. It generated the attributes and subelements as we instructed when creating the file template.
1 2 3 4 5 6 7 8 9 10 11 12 13 14 15 16 17 18 19 20 21 22 23 24 25 | <SyncFRRAWDATA releaseID="9.2"> <ApplicationArea> <Sender> <LogicalID> </LogicalID> <ComponentID>External</ComponentID> <ConfirmationCode>OnError</ConfirmationCode> </Sender> <CreationDateTime>2022-12-25T10:09:11.997Z</CreationDateTime> <BODID> </BODID> </ApplicationArea> <DataArea> <Sync> <AccountingEntityID/> <LocationID/> <ActionCriteria> <ActionExpression actionCode="Replace"/> </ActionCriteria> </Sync> <FRRAWDATA FileName="File name" FileExtension="csv" FilePath="FR_File_In"> <DocumentID>RD-954584925-1670321351981</DocumentID> <RawData>UmVhZCBwb3N0cyBmcm9tIGh0dHBzOi8vd2FybmFqaXRoLmJsb2dzcG90LmNvbS8gYW5kIGh0dHBzOi8vd2FybmFqaXRoLndvcmRwcmVzcy5jb20v<RawData> </FRRAWDATA> </DataArea> </SyncFRRAWDATA> |
Infor IDM Api payload
1 2 3 4 5 6 7 8 9 10 11 12 13 14 15 16 17 18 19 20 21 22 | <item xmlns="http://infor.com/daf"> <attrs> <attr> <name>SBU</name> <value>SBU1</value> </attr> <attr> <name>UpdalodDate</name> <value><IonApiRef>SyncFRRAWDATA/ApplicationArea/CreationDateTime</IonApiRef></value> </attr> </attrs> <resrs> <res> <filename><IonApiRef>SyncFRRAWDATA/DataArea/FRRAWDATA/@FileName</IonApiRef></filename> <base64><IonApiRef>SyncFRRAWDATA/DataArea/FRRAWDATA/RawData</IonApiRef></base64> </res> </resrs> <acl> <name>Public</name> </acl> <entityName>BDX_FR_FILE</entityName> </item> |
- Line numbers 2 to11: There are two <attr> occurrences because we defined two mandatory attributes in the IDM Document Type.
- <IonAPiRef> is used to map the respective BOD element or attribute.
- Line Number 21: <entityName> is the name of the IDM Document Type.
Appendix 2
Steps to create the Python script
- Go to Scripting - > Scripts -> Add.
- Change the Name to Change_File_Name_IDM.
- Add the following script.
 1
 2
 3
 4
 5
 6
 7
 8
 9
10
11
12
13
14
15
16
17
from xml.etree import ElementTree as etree

tree =  etree.fromstring(input_var_1)

for node in tree.getiterator():

    if node.tag == 'FRRAWDATA':

       fn = node.attrib.get('FileName')
       fe = node.attrib.get('FileExtension')
       n_fn = fn +'.'+ fe
       node.attrib['FileName'] =n_fn

root = tree
#print (etree.tostring(root,encoding='UTF-8', method='xml', short_empty_elements=True))
decoded = etree.tostring(root,encoding='UTF-8', method='xml', short_empty_elements=True)
output_var_1 = decoded
- In the Property section, under the Input and Output select Edit. In the popup add the variable below. Click Update to close the popup.
Direction Variable Name Data Type Input Variables input_var_1 String Output Variables ouput_var_1 String 
- And test the script by copying the same Sync.FRRAWDATA into the input_var_1. If all is well, you can see now FileName attribute includes the file extension.
- Then go back to the Script home dashboard and approve the script.


Using Mapping Activity instead of Script
- Go to Connect -> Mappings -> Add -> Graphical Mapping.
- Name the map Map_IDMFileNameChange.
- Select Sync.FRRAWDATA for both Source and Target.
- In the Modeler tab, drag Sync.FRRAWDATA element from the source and drop it onto the Sync.FRRAWDATA in the target. Then mapper will connect other elements.

- Go to the XSLT Editor. Remove the highlighted code line. When you try to change it, the editor will ask you want to switch to editing mode. Click on Yes.

- Paste the below code into the removed line. Note line number 12 which concatenates both file name and extension.
 1
 2
 3
 4
 5
 6
 7
 8
 9
10
11
12
13
14
15
16
17
18
19
20
21
22
23
24
25
26
27
28
29
30
31
32
<xsl:copy-of select="/*:SyncFRRAWDATA/*:ApplicationArea" copy-namespaces="no"/>
<xsl:if test="/*:SyncFRRAWDATA/*:DataArea">
	<xsl:element name="DataArea">
		<xsl:copy-of select="/*:SyncFRRAWDATA/*:DataArea/*:Sync" copy-namespaces="no"/>
		<xsl:element name="FRRAWDATA">
			<xsl:if test="/*:SyncFRRAWDATA/*:DataArea/*:FRRAWDATA/@FileExtension">
				<xsl:attribute name="FileExtension">
					<xsl:value-of select="/*:SyncFRRAWDATA/*:DataArea/*:FRRAWDATA/@FileExtension"/>
				</xsl:attribute>
			</xsl:if>
			<xsl:attribute name="FileName">
				<xsl:value-of select="fn:concat(/*:SyncFRRAWDATA/*:DataArea/*:FRRAWDATA/@FileName,'.',/*:SyncFRRAWDATA/*:DataArea/*:FRRAWDATA/@FileExtension)"/>
			</xsl:attribute>
			<xsl:if test="/*:SyncFRRAWDATA/*:DataArea/*:FRRAWDATA/@FilePath">
				<xsl:attribute name="FilePath">
					<xsl:value-of select="/*:SyncFRRAWDATA/*:DataArea/*:FRRAWDATA/@FilePath"/>
				</xsl:attribute>
			</xsl:if>
			<xsl:if test="/*:SyncFRRAWDATA/*:DataArea/*:FRRAWDATA/*:DocumentID">
				<xsl:element name="DocumentID">
					<xsl:value-of select="/*:SyncFRRAWDATA/*:DataArea/*:FRRAWDATA/*:DocumentID/text()"/>
				</xsl:element>
			</xsl:if>
			<xsl:if test="/*:SyncFRRAWDATA/*:DataArea/*:FRRAWDATA/*:RawData">
				<xsl:element name="RawData">
					<xsl:value-of select="/*:SyncFRRAWDATA/*:DataArea/*:FRRAWDATA/*:RawData/text()"/>
				</xsl:element>
			</xsl:if>
		</xsl:element>
		<xsl:value-of select="/*:SyncFRRAWDATA/*:DataArea/text()"/>
	</xsl:element>
</xsl:if>
- Click on Validate to check errors.
- Test the XSLT to make sure we can see the File name with the extension.